
LOCKDOWN 3 – Self-Shooting
How to video yourself for an interview using a phone
By Lorne Guy – Producer Director with 17 years film production experience.
As lockdown bites once again, the need for safe working is as important as ever. At Good Guys we have been shooting throughout 2020 using Covid safe filming practices. But some may have to be producing your own content with clients or employees at home without video crews. Lockdown doesn’t need to stop your video interviews getting out there.
Here’s our quick guide for shooting a self-interview or statement on your phone at home. This isn’t a guide of how to professionally film cheaply but how to get good results with a phone.
Note: I’ll gives tips on using what you may have around the house but I also recommend how from £100 you can buy 3 bits of kit that will really enhance your phone shoot.
SUMMARY
-
- Choose a quiet room with enough space
- Choose a location near a good light source
- Fix the phone to makeshift tripod or stand
- Video in landscape orientation (like a TV), unless for a specific set up.
- Sit close enough for the mic work at its best, approx. 50-60cms away from your nose (or use a clip mic)
- Avoid using the digital zoom
LOCATION
- Choose a good size room that is quiet
- Avoid noisy spaces near fridges, fizzing strip lights, fans or buzzing PCs
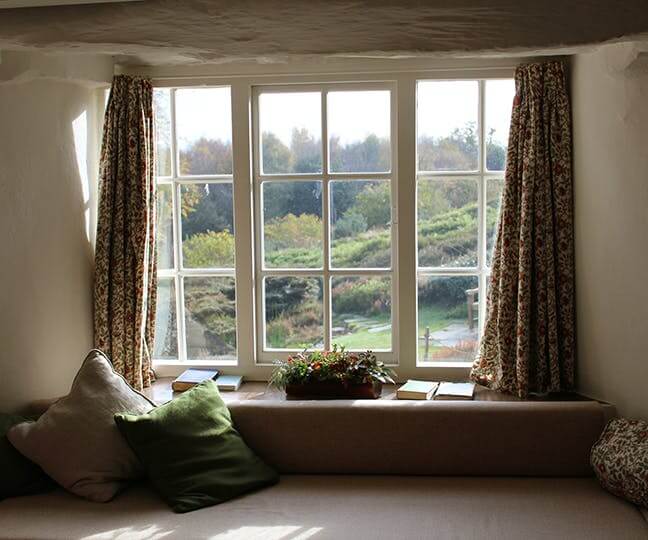
- Choose a space near daylight or access to lighting (desk lamps, stand lamps etc)
- Avoid bland white wall backgrounds if possible, it can look like a police wanted picture
TIP: I place plants and books to breakup backgrounds and a full book shelf is good.
TIP: The further away from any background you sit the more that background will blur
LIGHT – ALL cameras, however fancy, require light
 Notice how pics outside with good light are often sharper with a greater range and depth of colours? The better the light source, the better the camera sensor is able to work and hence the easier it is to get better image. I wont bang on about contrast ratios and weird stuff like the inverse square law as I don’t want to send you to sleep but best first step is to film near or get a good light source.
 The BIG FREE LIGHT IN THE SKY can be used directly, diffused or even bounced.
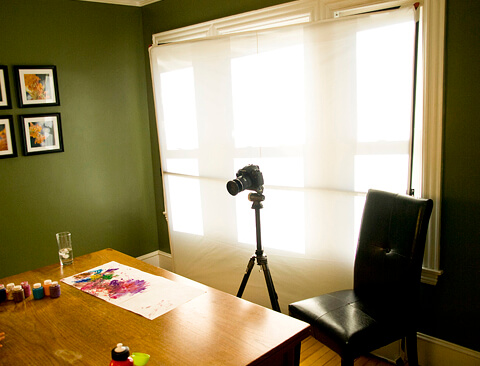
BASIC SET UP – Face the window, with the phone back to window facing you – This is the most basic way of using good light. This main source is called the key light. If it’s too bright or washed out, simply sit further back or tape a thin white sheet to the window to diffuse the light. If only net curtains were back in fashion ha ha as diffused light is more flattering. The sun moves and dips so take care if the shoot is over a longer period. But you can make this even better…
Try a 3/4 shot
(less side on than this image)
- Try sitting at an angle of approx. 40° to the window as the light is not so flat and sculpts the face.
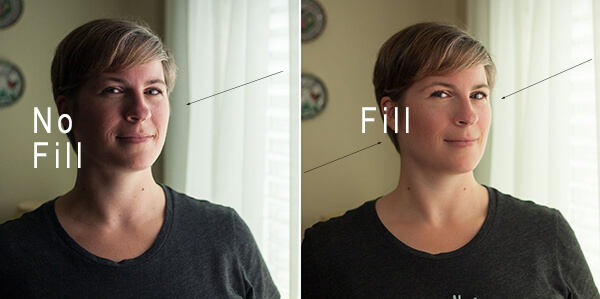
- Fill – Try adding a little fill light to the darker side of the face opposite the window by bouncing the daylight onto the darker areas of your face. Use anything that can bounce light like white packing card or a square of polystyrene. Or use a lamp to fill (match the light with a daylight or 5000k bulb). You are now creating three dimensional lighting.
- No SUN? –Try the 3/4 set up but replace the daylight or ‘Key Light’ with a lamp. If there is too much shadow then add a 2nd lamp (less bright) and ‘Fill’ the darker areas. Also use diffusion here, white bed sheet etc. Move the lamps back and forth to get best look. Ensure the lamp is not too low or high as it could look a bit ‘horror’. Experiment. Sometimes two diffused lamps on one side of the phone (one brighter) can look good.
- LAMP too bright? or no space?. Simple move it back or turn it to bounce it off a wall or ceiling.

No sun? Try a 2 light set up using a desk lamp or standard lamp, often better with a bare bulb and plenty of diffusion like a bed sheet or baking paper
TIP : Household baking paper or parchment placed in front makes a good diffuser
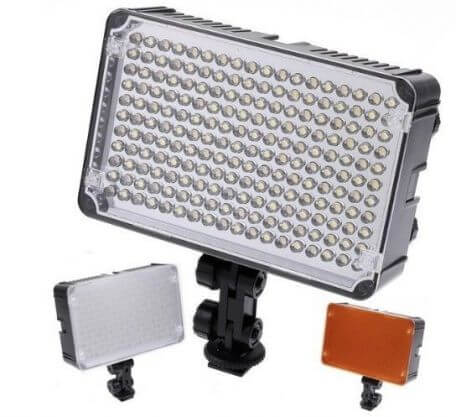
A small light investment is worth it, here’s some ideas/links
SINGLE Cheap option £60 LED Bi Colour inc batteries (no stand – approx. £25) For the money this light looks great and will work well as a fill or single key light
2 X NEWER LED Interview Lights, Bi Colour Inc stands, bags – £155 I have these for small jobs, great value, well-built aluminium. Bi colour which means you can use in daylight or tungsten (warm indoor lighting). Can also run on rechargeable NP-F970 Li-ion batteries
Aputure Amaran F7 LED Bi Colour Cam/stand mount light. £99Another one I use. Not the cheapest but a surprisingly strong and versatile light, small and compact. Needs Sony NP-F970battery (3hrs) and a light stand
FILM IN LANDSCAPE
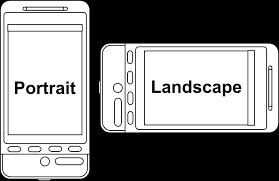 For most video outputs film in the same orientation as your tv. This is a standard 16:9 aspect ratio used to embed on websites, YouTube or Vimeo.
But platforms like Instagram and Tik Tok prefer square or vertical orientation as they exclusiely target smart phones. Do check
If you do film PORTRAIT or have portrait footage you can still use this without vertical bars if your editor creates ingenious ways to use gfx shapes within graphics and it can still look fab.
Check out how Mark Breakwell http://www.wowmedialtd.com/ cleverly used and edited self-filmed phone portrait interviews in a landscape edit.

SOUND.
Next to lack of light, poor sound is the biggest and most common indicator of an unprofessional shoot. Ever seen interviews that sound echoey and distant?
Two Choices…
- Keep the phone close. Most phones front camera have a lens of about 22-30mm. This means you can place the camera at about 60-70cm away from your face to get a good interview frame size. At this distance the sound will still be acceptable. If you use the selfie lens this is even wider which means you can place it even closer at 30cm from you, but this back lens has compromises so I recommend the main lens if possible.
OR BETTER STILL…
- Buy a cheap personal mic (also called lavaliere) which clips to you OR an external mic, attaches to the phone. Both of these mics are better set up for a clean rounded richer sound and better than most phone mics.
- Take care with personal mics to ensure they are placed correctly and can be faced down if you want to reduce any popping or ‘ssss’ noises. Above the chest , below the neck is good. Avoid placing near necklaces and ruffly clothing. It’s acceptable now for the audience to see a small personal mic near a collar or neckline
 My low budget sound kit recommendations/links
- Cheap Personal Mic or Lavalier £13.95
- Branded Personal Mic/Lavalier – Rode £49
- Cheap external mobile mic £29.95
- Branded external phone mic – Rode VideoMicro £49
ROCK STEADY
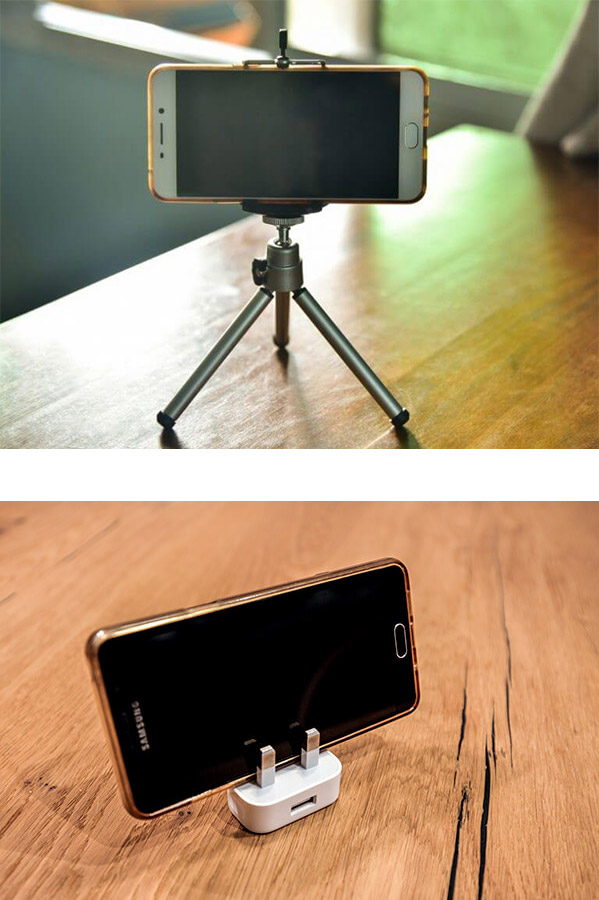 Try to fix the phone. Avoid holding the phone. A camera is able to produce its best image if it is still. That’s why you’ll see professional studio interviews with cameras on tripods. Same too for phone cameras, even on automatic settings. Therefore, if you can fix the phone this helps the image, the viewer and importantly helps with cleaner sound. Use anything from resting against a book to using a 3pin plug to a bean bag or an old car phone holder. There are also plenty of cheap flexible stands out there too.
Check out these free or cheap options:
Finally…
WHERE IN THE FRAME?
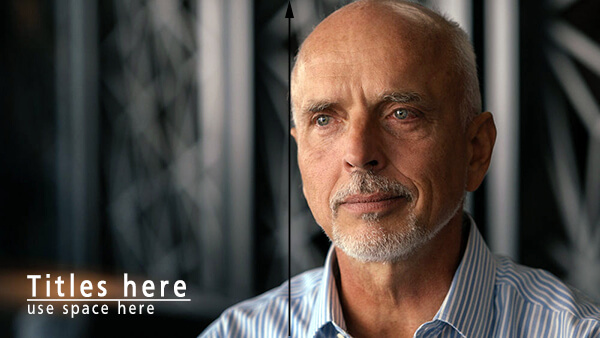 This can be varied and depends upon the type of interview. Is it a self to camera? or a self to an imaginary interviewer? The later, as shown here, would favour the ‘thirds’ look with you placing yourself to one side of the middle line, leaving space for titles.
TIPS:
- Avoid using digital zooms as it just expands the pixels creating a poor image.
- Manual Exposure control – Check the phones menu or on the video screen for manual video settings. Auto exposure might ‘see’ the wrong area of light and put you in the dark or too bright. But you can manually adjust the exposure to get the image and you looking great. A phone will have manual settings that can be easily mastered via video menu or simply sliding finger up and down
Any enquiries or questions just message me or go to the Good Guys site for contact details.
